Improve
Updates for Rock 3.0
No updates made.Updates for Rock 1.0
No updates made.
Hello World
Everyone knows the HelloWorld tutorial. We'll create a do-nothing, barebones Hello World
Block
from scratch and show you how to load it onto a page in your own Rock.
We strongly encourage you to get started and actually perform each step as you're
reading. The easiest way to get your custom development environment up and
running is to
pull the develop branch from the Rock repo on Github.
Note:
Throughout the rest of the tutorial you'll see variations of the
domain "RockSolidChurch.org". This is just a generic placeholder.
You should replace it with your organization's domain name.
Step 1 - Add New Item
In the Solution Explorer pane (to the right of your main window by default), find your
RockWeb\Plugins\org_rocksolidchurch\ then right click it and
select Add New Item.
Next, under Visual C#, choose "Web User Control" and give it the name
HelloWorld.ascx.
Add New Item
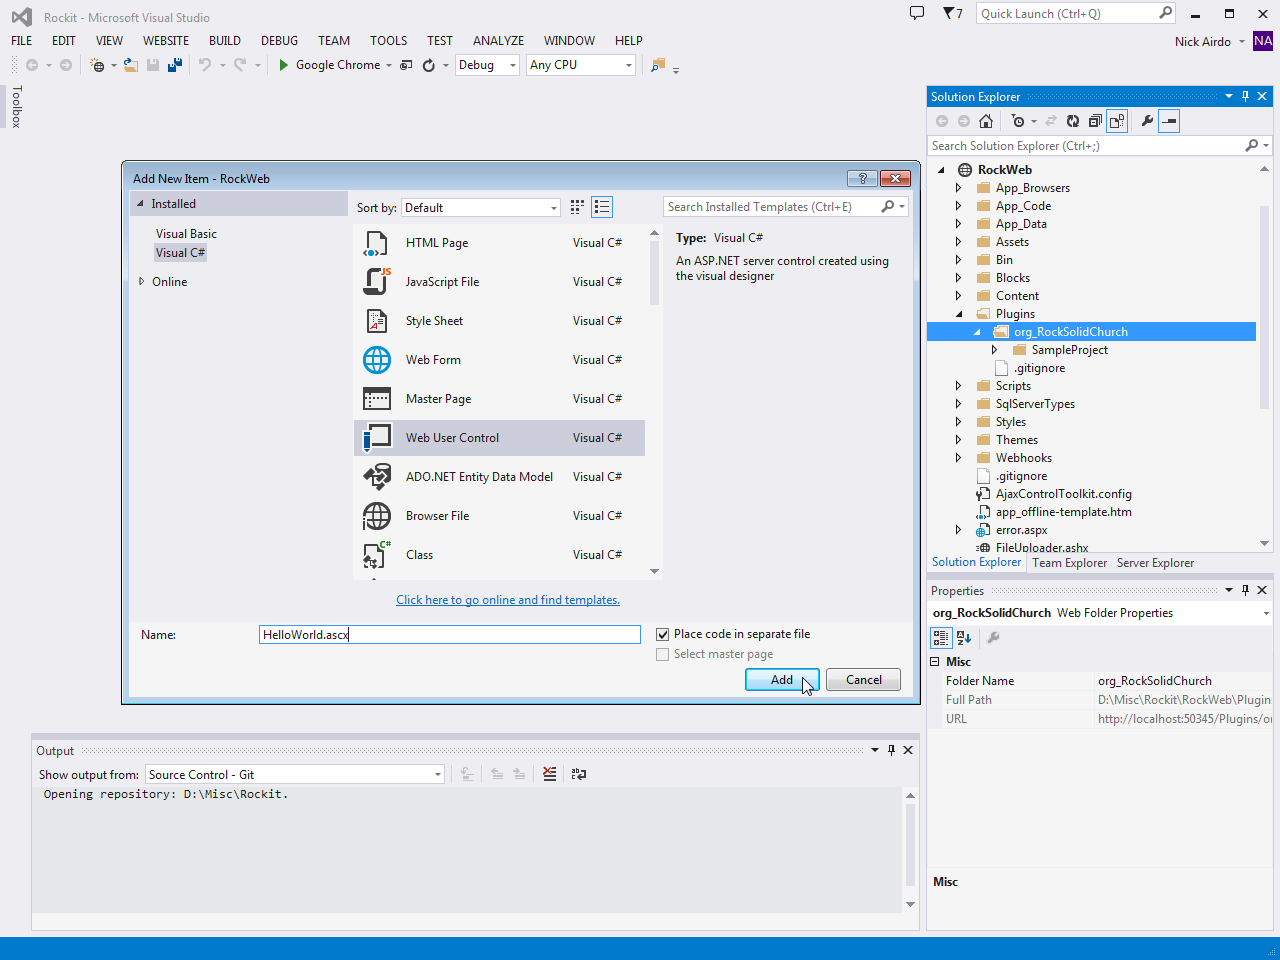
Press Add so
you can start editing.
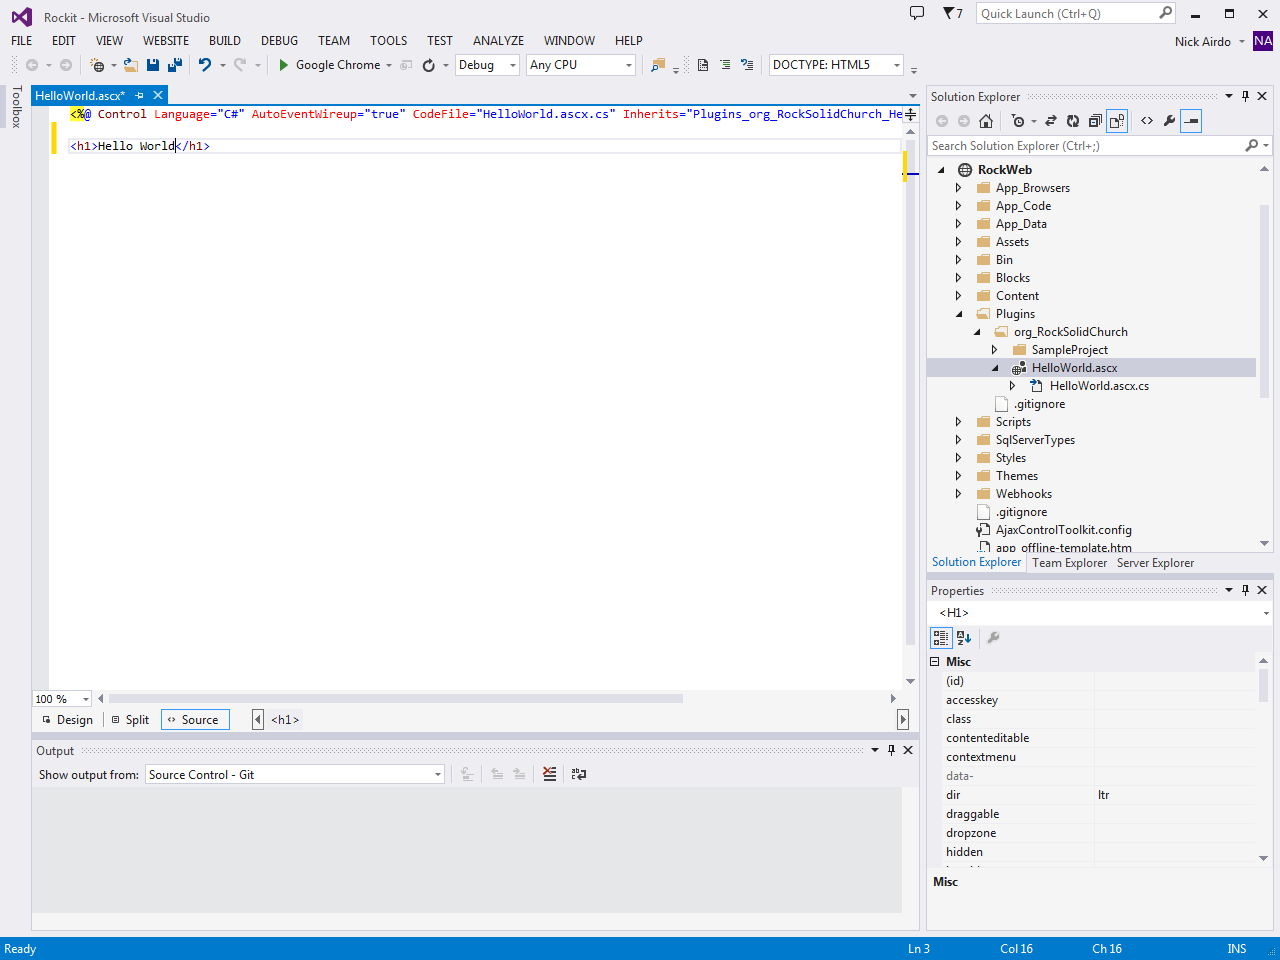
Step 2 - Edit Markup
Edit the markup in the
HelloWorld.ascx and add the defacto text, Hello World.
You can spice it up with a little HTML markup if you wish - but don't go too crazy
yet.
Editing your markup in the .ascx
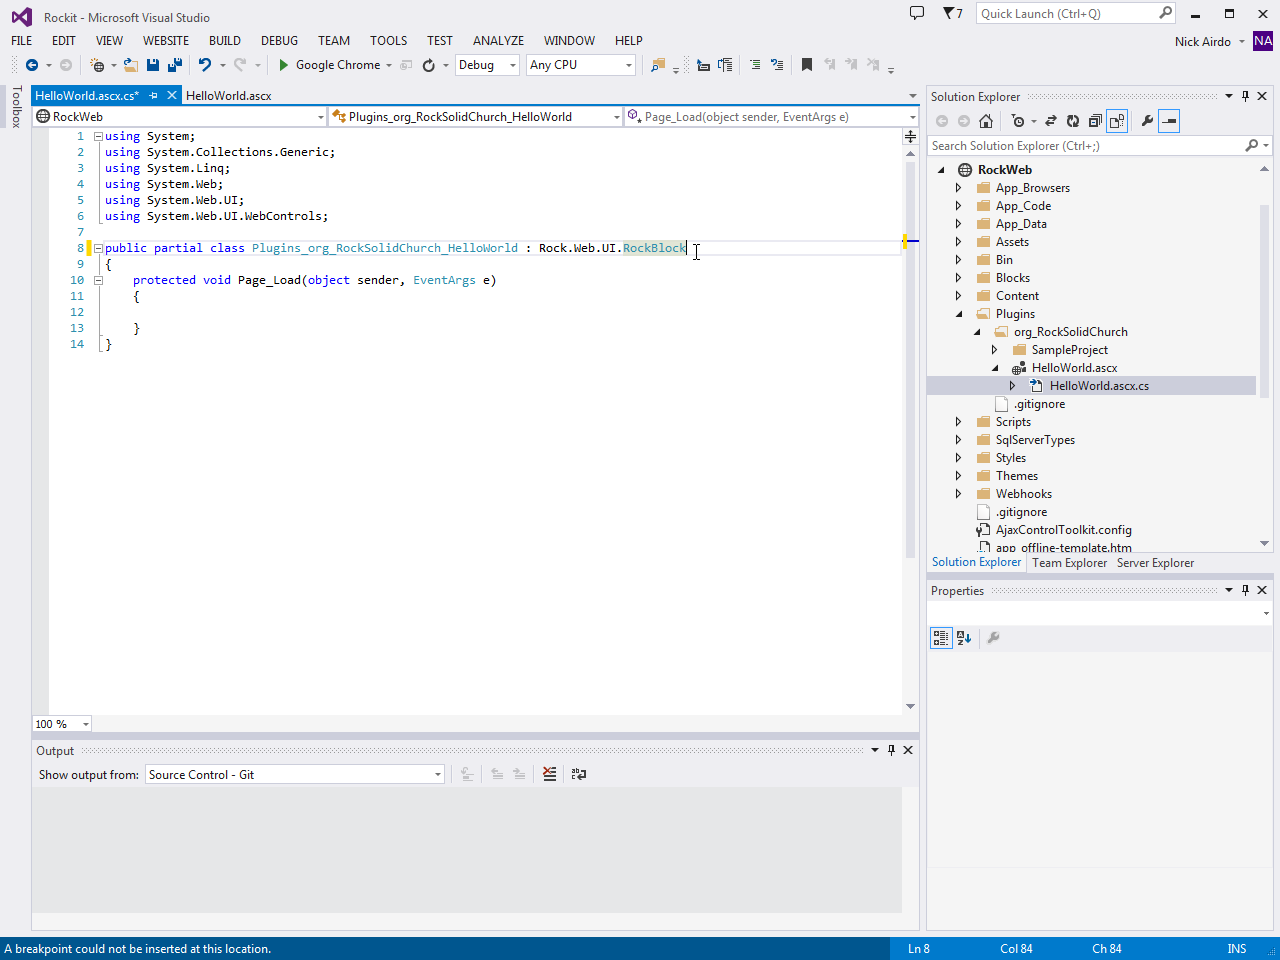
Step 3 - Edit Code
Edit the code file called
HelloWorld.ascx.cs (which can be made visible by expanding
HelloWorld.ascx in the Solution Explorer) and change its inheriting class
from the default System.Web.UI.UserControl
to Rock.Web.UI.RockBlock.
Doing that gives your standard ASP.Net usercontrol the super-powers of a
Rock block. We'll show you how that happens a little bit later.
Editing your markup in the .ascx
That's it. Now we'll show you how easy it is to register your new block
and add it to a page so you can see it in action.
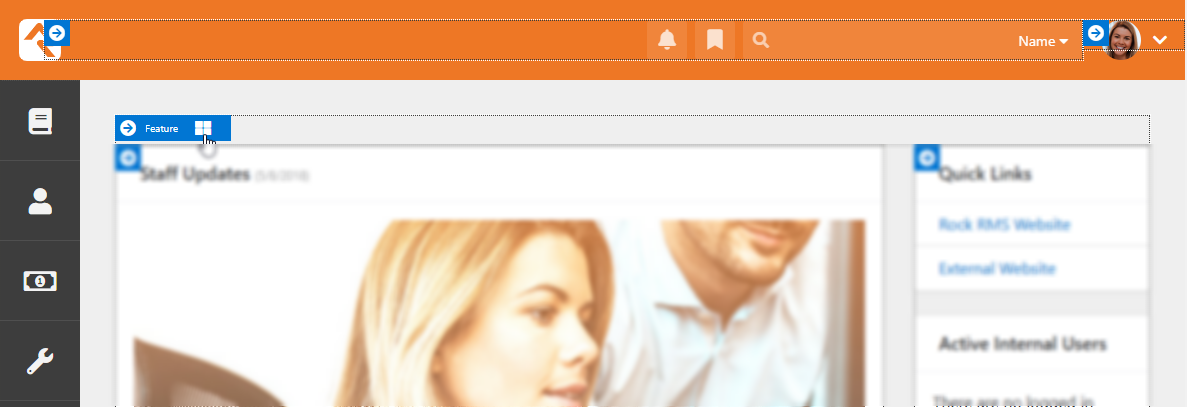
Step 4 - Add the block to a zone
Start Rock from inside Visual Studio by pressing F5
and log in as the Admin.
Logging into your Rockit
The default password for the Admin user is admin.
You could create a new page and so forth, but let's keep this simple and just add your
new block to the main home page. You can read more about adding blocks and pages in the
Designing and Building Websites Using Rock
guide.
-
Select the (Page Zone Editor)
button in the page’s Admin Toolbar, which can be found as you hover the cursor at the bottom right of your screen.
-
(That should highlight all of the zones on the page for you.)
-
Hover over the fly-out toolbar for the zone you wish to add the block to and
click its (Zone Blocks) button.
This will bring up the zone's block list.
Zone 'fly-out-toolbar'
-
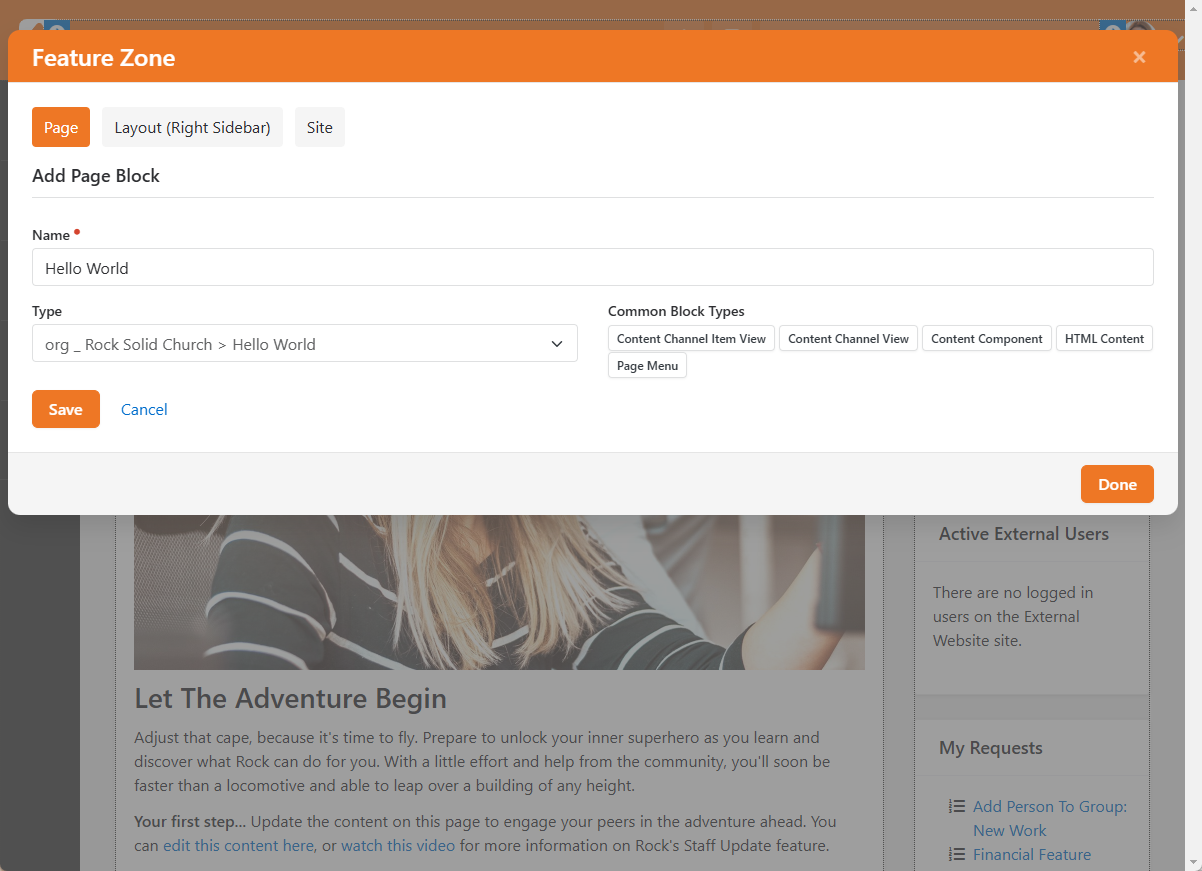
Next, click the (Add Block)
button to add the block to the layout. Skip the Name field for the moment and select your new "Hello World" block from
bottom of the Type dropdown list (hint: you can type "Hello" to find it quicker).
Add New Item
-
Click the Save button.
-
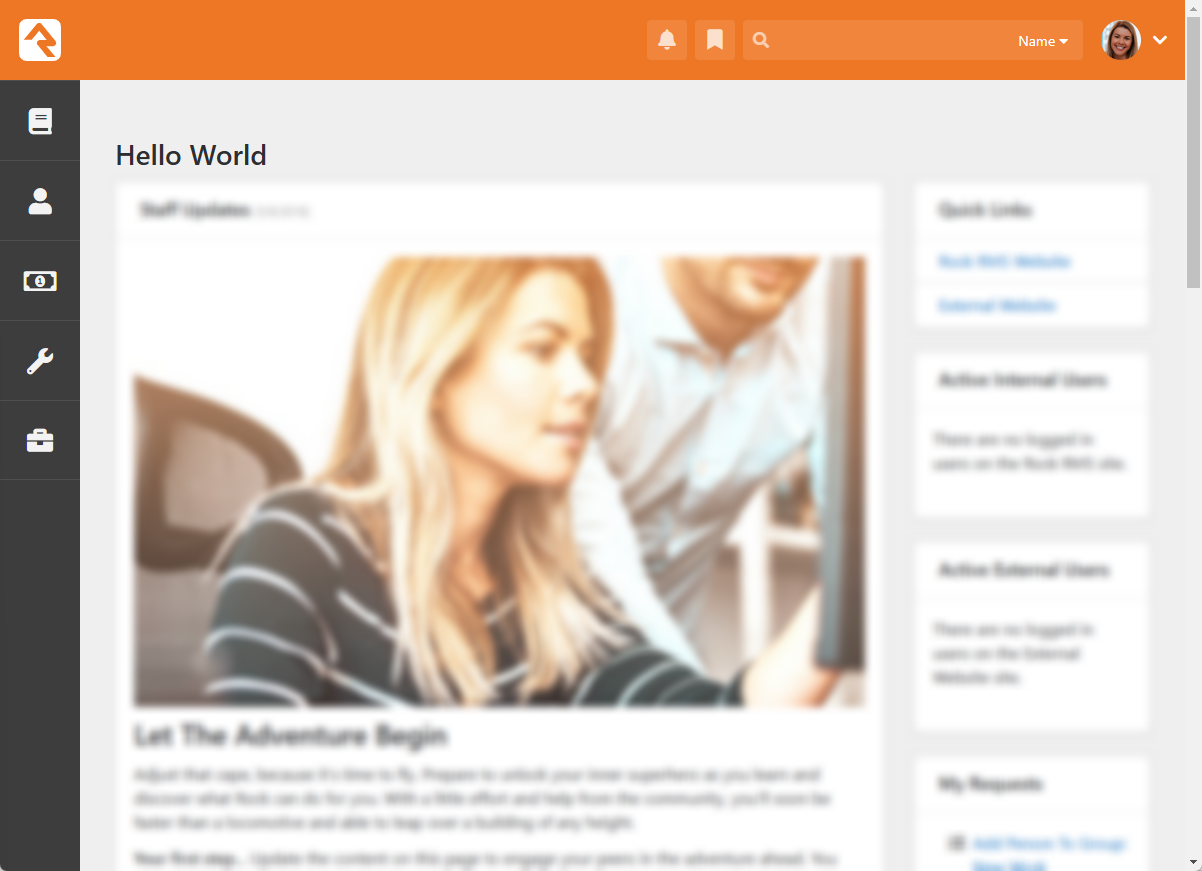
Now that you've added your block, click the Done
link and the page will reload with your Hello World block now on the page.
How did that happen?
You may have noticed you never actually registered your new block the
way you have to with other CMS systems. That's because Rock automatically registers
blocks when they are discovered in your Plugins folder. Pretty cool, right?
Hello World
Fetching Data
Now that you've seen your code run in Rock, let's actually fetch some existing
data from Rock. We're going to build a block that lists all the names
of everyone in the database.
A block that fetches data
Step 1 - Copy sample block
Let's create a new block but this time let's save some time by
starting with the example
Stark
block that comes shipped with Rock.
Create a new Tutorials folder in RockWeb\Plugins\org_rocksolidchurch\
and copy the StarkDetail.ascx file (along with its .ascx.cs file) from
the RockWeb\Blocks\Utility\
into it. Rename the StarkDetail.ascx file HelloWorldFetchingData.
Tip:
We're using a "Tutorials" folder to keep our related code blocks
nice and organized. It's a good idea to organize your associated
blocks together in a common folder and project name.
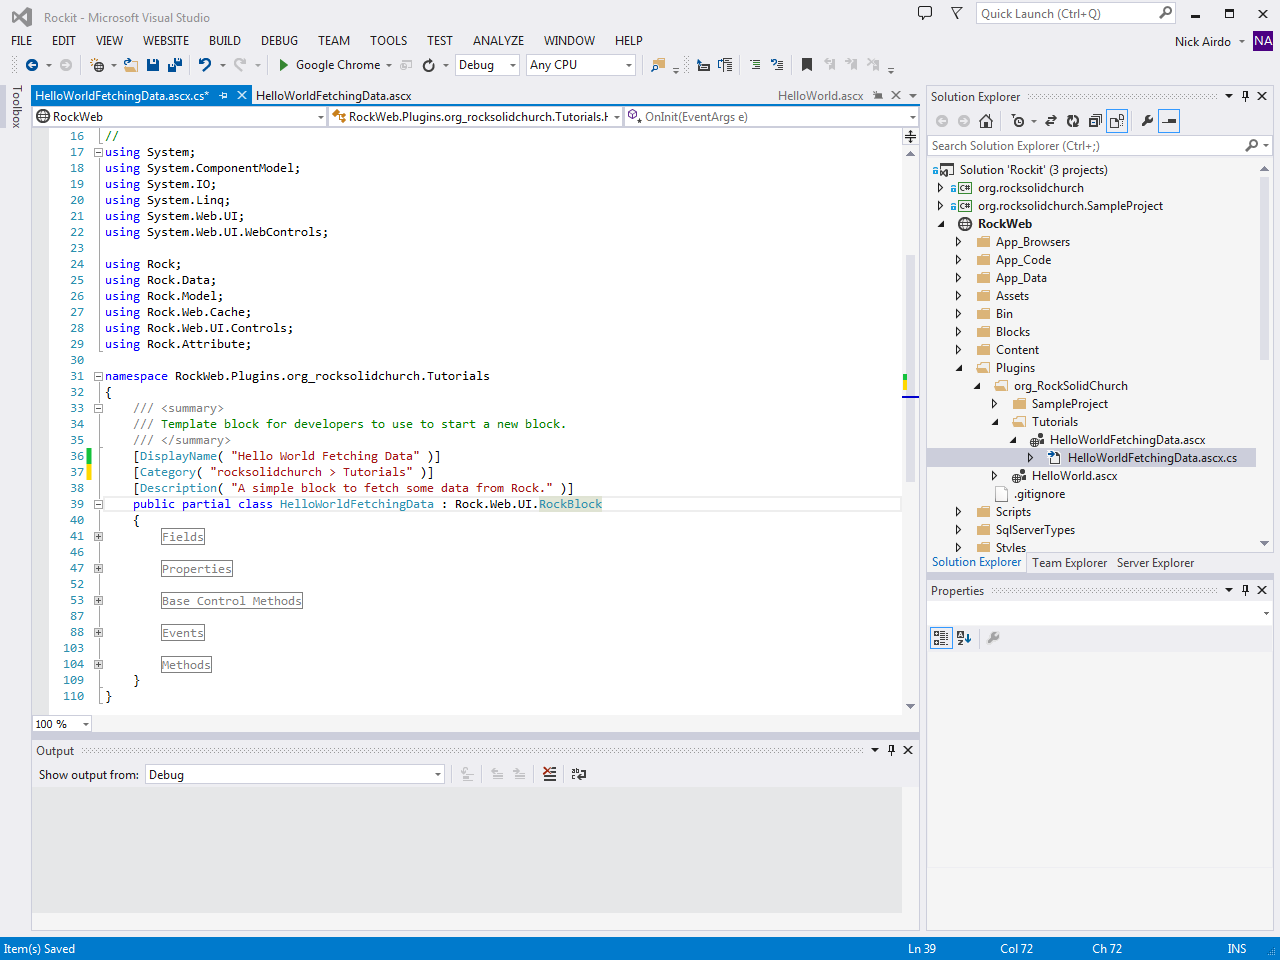
Step 2 - Update classname/namespace
Now let's make this our own. We need to edit the classname and namespaces
so that our code does not collide with any other existing code.
Edit the HelloWorldFetchingData.ascx
file and change the Inherits="RockWeb.Blocks.Utility.StarkDetail" to
Inherits="RockWeb.Plugins.org_rocksolidchurch.Tutorials.HelloWorldFetchingData", remembering to replace org_rocksolidchurch with our own organization's namespace.
HelloWorldFetchingData.ascx
Similarly, update the namespace in the
HelloWorldFetchingData.ascx.cs
from RockWeb.Blocks.Utility to RockWeb.Plugins.org_rocksolidchurch.Tutorials and
update the class name from StarkDetail to HelloWorldFetchingData.
You'll also need to ensure that the code has the following using statements:
using System;using System.ComponentModel;using System.Linq;using System.Web.UI;using System.Web.UI.WebControls;using Rock.Data;using Rock.Model;using Rock.Attribute;
You probably noticed the three lines just above the class definition
called DisplayName, Category, and Description. These class decorator
attributes are used to organize the list of blocks in Rock.
Set the DisplayName with an appropriate name for your block and the
Category using the convention of "OrganizationName > Project".
Don't forget to include a concise explanation of the block in the Description field too.
HelloWorldFetchingData.ascx.cs
Step 3 - Markup
We need a place to put all those names we're about to fetch.
The Rock:Grid is a perfect UI control for this sort of thing.
Edit the markup in the HelloWorldFetchingData.ascx
and replace the <ContentTemplate> section with this:
<ContentTemplate>

    <Rock:Grid ID="gPeople" runat="server" AllowSorting="true">
        <Columns>
            <asp:BoundField DataField="FirstName" HeaderText="First Name" />
            <asp:BoundField DataField="LastName" HeaderText="Last Name" />
        </Columns>
    </Rock:Grid>

</ContentTemplate>
That's a grid with two columns. One for the person's first name and one for
their last name.
Step 4 - Code
Now we can add code to go and fetch the people data. We'll use Rock's PersonService() class to get all
people, and then bind it to the data-source of our grid. Edit the code in HelloWorldFetchingData.ascx.cs.
Find the OnLoad() Base Control Method. Replace it with the following code:
protected override void OnLoad( EventArgs e )
{
    base.OnLoad( e );

    if ( !Page.IsPostBack )
    {
        var items = new PersonService( new RockContext() ).Queryable().ToList();
        gPeople.DataSource = items;
        gPeople.DataBind();
    }
}
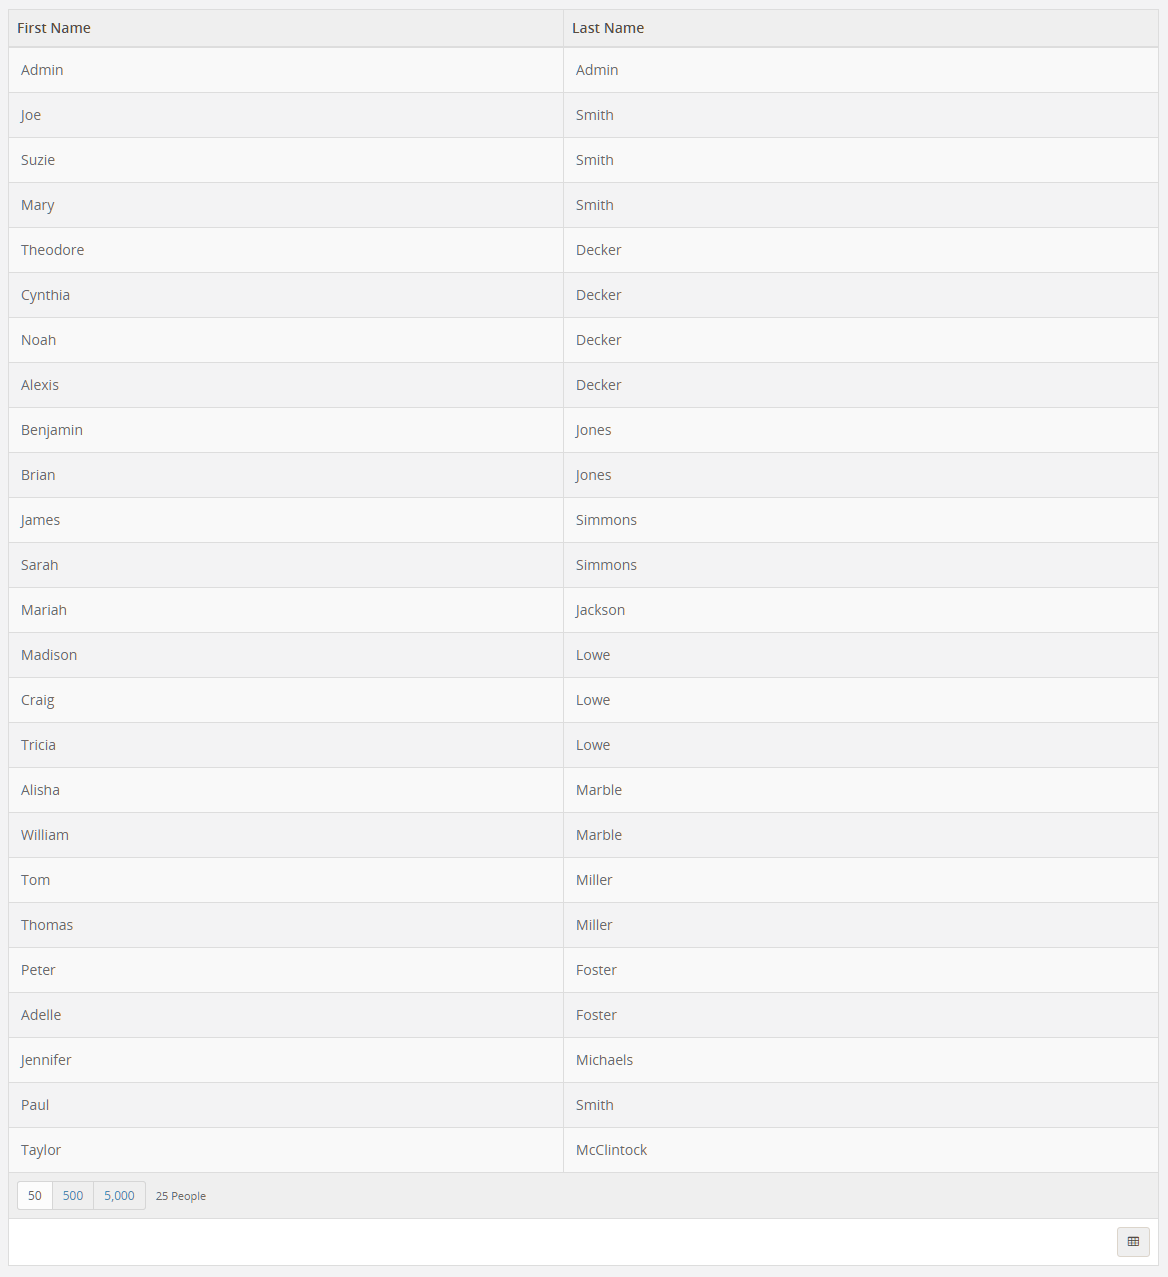
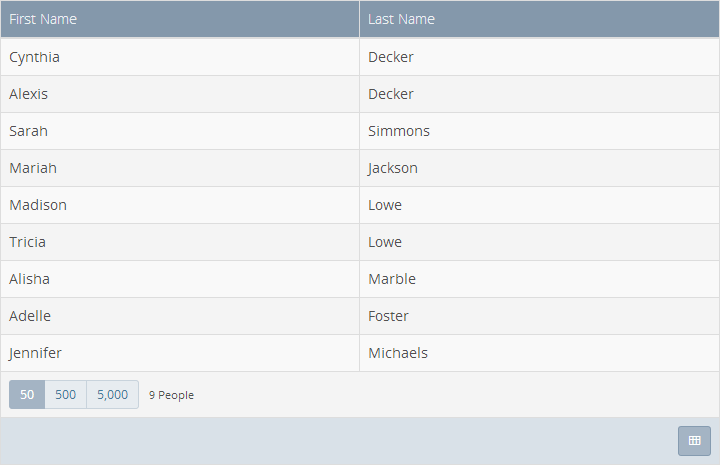
Step 5 - Go Look
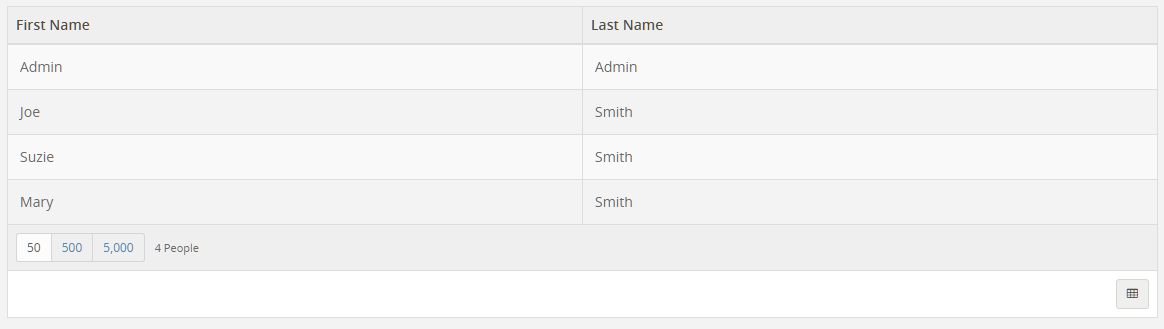
Press F5 in Visual Studio to start Rock then add the block to a page
just like you did in the first tutorial. You should see a simple grid
listing all the people in your database.
The results
Uh oh!
Don't see anyone listed? Try adding some fake people data to your
database. Use the Sample Data block found under Admin Tools >
Power Tools.
Configurable Blocks
You're making great progress. Now let's continue with the previous
tutorial and show you how to make the block configurable using
Block Attributes.
Reviewing Your Options
The grid we created might list thousands of records.
Perhaps we should limit it to include only males? You could hardcode
that logic into a Where clause like this:
var items = new PersonService( new RockContext() ).Queryable()
    .Where( p => p.Gender == Gender.Male ).ToList();
However, it would be smarter to make the gender choice a configurable
setting. This is where Block Attributes come in handy.
They are one of Rock's amazingly powerful features.
Let's see how easy it is to add a configuration setting to
the block.
Step 1 - Add an Attribute
Edit the HelloWorldFetchingData.ascx.cs
file and add a CustomRadioListField
attribute just above the class definition like this:
using Rock.Attribute;

// ...

[CustomRadioListField( "Gender Filter", "Select in order to list only records for that gender",
     "1^Male,2^Female", required: false )]
public partial class HelloWorldFetchingData : Rock.Web.UI.RockBlock
{
    //...
Note:
The using Rock.Attribute; gives you access to all kinds
of different block attributes in Rock.
Adding the CustomRadioListField
allows the administrator to optionally pick either
Male or Female in the block property settings. It's optional because we've set the
'required' parameter to false.
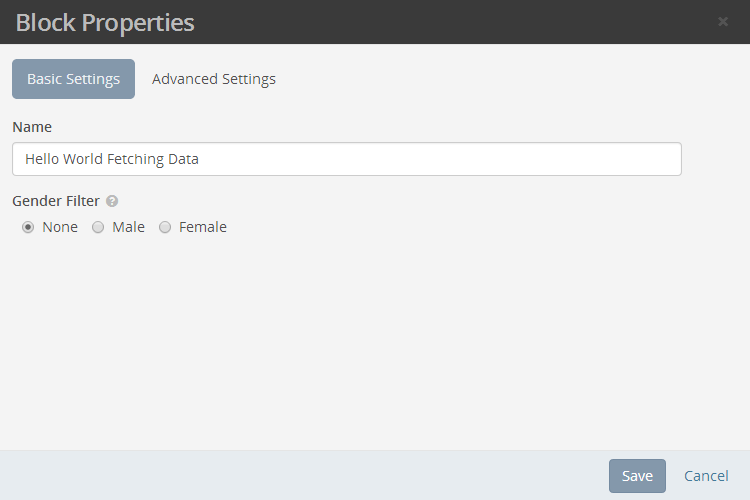
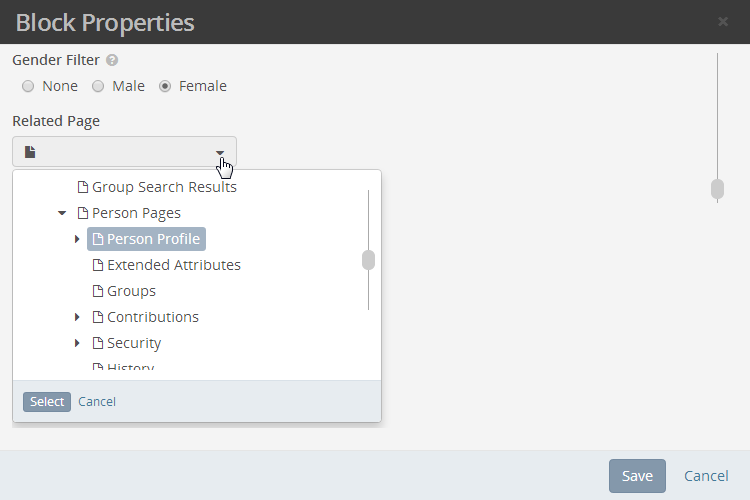
In a few minutes once you're done and the block is on a page, you can access these settings by clicking the
(Block Configuration) button in the
Admin Toolbar
followed by the
(Block Properties) button from the block's fly-out menu.
HelloWorldFetchingData.ascx
But first let's continue and write the code that fetches that value set by the administrator.
Step 2 - Get and Use the Attribute Value
Fetch the selected gender value using Rock's GetAttributeValue() method by
passing it the attribute's key, GenderFilter. The key is just the attribute name with all
spaces removed.
protected override void OnLoad( EventArgs e )
{
    base.OnLoad( e );

    if ( !Page.IsPostBack )
    {
        var genderValue = GetAttributeValue( "GenderFilter" );
Now use the value to limit the query. Let's change our variables
a bit so we only perform the Where() clause when the administrator actually selected
a particular gender. Then call the ToList() method last,
right as we're setting it to the grid's data-source.
var query = new PersonService( new RockContext() ).Queryable();

if ( ! string.IsNullOrEmpty( genderValue ) )
{
    Gender gender = genderValue.ConvertToEnum<Gender>();
    query = query.Where( p => p.Gender == gender );
}

gPeople.DataSource = query.ToList();
gPeople.DataBind();
Note:
Notice the use of the handy ConvertToEnum() extension method to
convert our 1 and 2 string values into a proper
Gender enumeration? The using Rock; gives you access to many
useful extension methods we've created for you.
Final Code
When finished, your entire *.cs file should look something like this:
using System;
using System.ComponentModel;
using System.IO;
using System.Linq;
using System.Web.UI;
using System.Web.UI.WebControls;

using Rock;
using Rock.Data;
using Rock.Model;
using Rock.Web.Cache;
using Rock.Web.UI.Controls;
using Rock.Attribute;

namespace RockWeb.Plugins.org_rocksolidchurch.Tutorials
{
    /// <summary>
    /// Template block for developers to use to start a new block.
    /// </summary>
    [DisplayName( "Hello World Fetching Data" )]
    [Category( "rocksolidchurch > Tutorials" )]
    [Description( "A simple block to fetch some data from Rock." )]

    [CustomRadioListField( "Gender Filter", "Select in order to list only records for that gender",
         "1^Male,2^Female", required: false )]
    public partial class HelloWorldFetchingData : Rock.Web.UI.RockBlock
    {
        #region Base Control Methods

        /// <summary>
        /// Raises the <see cref="E:System.Web.UI.Control.Load" /> event.
        /// </summary>
        /// <param name="e">The <see cref="T:System.EventArgs" /> object that contains the event data.</param>
        protected override void OnLoad( EventArgs e )
        {
            base.OnLoad( e );

            if ( !Page.IsPostBack )
            {
                var genderValue = GetAttributeValue( "GenderFilter" );

                var query = new PersonService( new RockContext() ).Queryable();

                if ( !string.IsNullOrEmpty( genderValue ) )
                {
                    Gender gender = genderValue.ConvertToEnum<Gender>();
                    query = query.Where( p => p.Gender == gender );
                }

                gPeople.DataSource = query.ToList();
                gPeople.DataBind();
            }
        }

        #endregion
    }
}
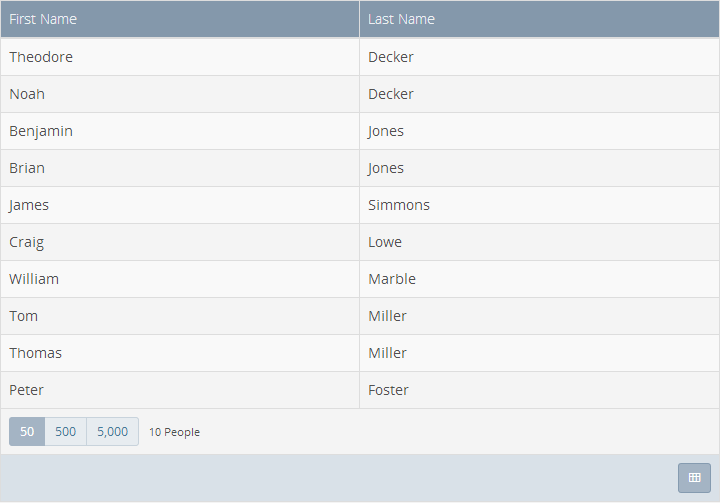
Depending how you set the block property, you'll see different results.
When the block property is set to male you'll see only the men:
Gender block property set to Male
...and only women when the block property is set to female:
Gender block property set to Female
Connecting Blocks
It would be nice if our block would take you to the person's details when you
click a name, right? Let's make that happen.
Step 1 - Add an event handler to the grid
First we'll set an event handler named gPeople_RowSelected for the OnRowSelected property
of the grid. We also need to let the grid know that the Id property of an item in the grid
represents the key/identifier for the item in each row. We do this by adding DataKeyNames="Id"
to the grid's markup. We'll use the key value when we handle the OnRowSelected event in our code.
<Rock:Grid ID="gPeople" runat="server" AllowSorting="true"
    OnRowSelected="gPeople_RowSelected" DataKeyNames="Id">
Step 2 - Handle that event in code
Now we can write code to do something when a particular row is clicked. Since Rock already has a
page with a named route "~/Person/{0}" for viewing a person's details, all we need to do is take the
person's Id (for the selected row's key) and redirect to the route.
Edit the *.cs file and add this event handler:
protected void gPeople_RowSelected( object sender, RowEventArgs e )
{
    int personId = (int)e.RowKeyValues["Id"];
    Response.Redirect( string.Format( "~/Person/{0}", personId ), false );

    // prevents .NET from quietly throwing ThreadAbortException
    Context.ApplicationInstance.CompleteRequest();
    return;
}
That's all there is to it!
That was a bit too easy. What will you do when there is no named route available?
Let's try a different, configuration based approach for those cases. Yep, you guessed it.
Another block property attribute to the rescue.
Step 2 redux - Use a LinkedPage block property
It's a common situation to link your block to another page where a related block lives.
By adding the LinkedPage
attribute to your block, the administrator can wire up your block to the page of their choosing.
[LinkedPage( "Related Page" ) ]
LinkedPage block property
The string "Related Page" is the attribute name and its key is just "RelatedPage".
Change your gPeople_RowSelected handler to call the special
NavigateToLinkedPage() method and pass in the attribute key that has the linked page,
the name of a query string parameter
and the value for that parameter. Since we're expecting the admin to link the block to the
Person Profile page,
we'll use the PersonId as the parameter and the person's Id will be the parameter
value.
Our code would look like this:
protected void gPeople_RowSelected( object sender, RowEventArgs e )
{
    NavigateToLinkedPage( "RelatedPage", "PersonId", (int)e.RowKeyValues["Id"] );
}
Rock will automatically build a redirect link in the form of .../Page/[id-of-related-page]?PersonId=[id-of-selected-person]
(E.g. http://rock.rocksolidchurchdemo.com/page/93?PersonId=2)
And yes, I tricked you because this new event handler code is even easier than the previous code.
Customizing and Securing Blocks
Sometimes you want to show certain features only to certain people or people with
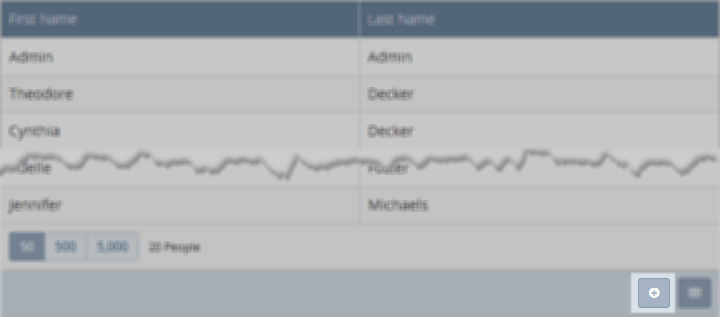
a certain role. Let's add a standard Add
button to the bottom of the grid that only shows up for people who are authorized with
"Edit" rights to our block.
Enabled Add button on grid
Step 1 - Check the user's authorization
Use the IsUserAuthorized() method by passing it the name of an
action. That method returns true if the person viewing the block is
authorized for that action. When true, we'll set the grid's Action bar to show the
Add button.
Add the using Rock.Security; in the top section of your block to get access to
the Authorization class and add the authorization check to the OnInit method like this:
using Rock.Security;
// ...
protected override void OnInit( EventArgs e )
{
    base.OnInit( e );

    if ( IsUserAuthorized( Authorization.EDIT ) )
    {
        gPeople.Actions.ShowAdd = true;
    }

    // ...
Note
If it makes more sense for the authorization check to be based on the page
where the block lives, you can do a page authorization check like this:
var currentPage = Rock.Web.Cache.PageCache.Read( RockPage.PageId );
currentPage.IsAuthorized( Authorization.EDIT, CurrentPerson );
Step 2 - Handle the button click
Let's wrap this up by handling the click action for your new Add button.
We'll register a click handler called gPeople_Addin the OnInit()
method and then create the handler method in the appropriate code region.
protected override void OnInit( EventArgs e )
{
    base.OnInit( e );

    if ( IsUserAuthorized( Authorization.EDIT ) )
    {
        gPeople.Actions.ShowAdd = true;
        gPeople.Actions.AddClick += gPeople_Add;
    }

    // ...

}

protected void gPeople_Add( object sender, EventArgs e )
{
    Response.Redirect( "~/NewFamily/" );

    // prevents .NET from quietly throwing ThreadAbortException
    Context.ApplicationInstance.CompleteRequest();
    return;
}
Once again, we can rely on a built-in named route used for adding new people/families.
Tip
For information about using "Page_Load (OnLoad) vs OnInit" read the Performance Considerations
in the Blocks documentation.
Step 3 - Code cleanup
For best practice sake, let's move our grid data binding code into it's own method
called BindGrid(). This will set us up for one more little improvement
we'll cover in the next step.
protected override void OnLoad( EventArgs e )
{
    base.OnLoad( e );

    if ( !Page.IsPostBack )
    {
        BindGrid();
    }
}

// ...

protected void BindGrid()
{
    var genderValue = GetAttributeValue( "GenderFilter" );

    var query = new PersonService( new RockContext() ).Queryable();

    if ( !string.IsNullOrEmpty( genderValue ) )
    {
        Gender gender = genderValue.ConvertToEnum<Gender>();
        query = query.Where( p => p.Gender == gender );
    }

    gPeople.DataSource = query.ToList();
    gPeople.DataBind();
}
Step 4 - That little improvement
Have you noticed that you've had to reload the page after you
change a block property in order to see it take effect? Let's
fix that so the grid refreshes immediately when the property
changes.
The Stark block you started with comes with the necessary event handlers
that allows you do something when the block's properties change. You may have
even seen those extra lines in the OnInit method and an empty
Block_BlockUpdated() code block. This Block_BlockUpdated()
method is being called but it won't do anything until you add some
appropriate code.
Now that we moved our data binding code to its own BindGrid() method, we can call it
in Block_BlockUpdated() like this:.
protected void Block_BlockUpdated( object sender, EventArgs e )
{
    BindGrid();
}
Now go and change the gender setting and watch the magic.
Best Practice
It's a best practice to handle the BlockUpdated event intelligently
whenever possible.
Here is the final, complete code:
using System;
using System.ComponentModel;
using System.IO;
using System.Linq;
using System.Web.UI;
using System.Web.UI.WebControls;

using Rock;
using Rock.Data;
using Rock.Model;
using Rock.Web.Cache;
using Rock.Web.UI.Controls;
using Rock.Attribute;
using Rock.Security;

namespace RockWeb.Plugins.org_rocksolidchurch.Tutorials
{
    /// <summary>
    /// Template block for developers to use to start a new block.
    /// </summary>
    [DisplayName( "Hello World Fetching Data" )]
    [Category( "rocksolidchurch > Tutorials" )]
    [Description( "A simple block to fetch some data from Rock." )]

    [CustomRadioListField( "Gender Filter", "Select in order to list only records for that gender",
         "1^Male,2^Female", required: false )]
    [LinkedPage( "Related Page" )]
    public partial class HelloWorldFetchingData : Rock.Web.UI.RockBlock
    {
        protected override void OnInit( EventArgs e )
        {
            base.OnInit( e );

            if ( IsUserAuthorized( Authorization.EDIT ) )
            {
                gPeople.Actions.ShowAdd = true;
                gPeople.Actions.AddClick += gPeople_Add;
            }

            // This event gets fired after block settings are updated.
            this.BlockUpdated += Block_BlockUpdated;
            this.AddConfigurationUpdateTrigger( upnlContent );
        }

        protected override void OnLoad( EventArgs e )
        {
            base.OnLoad( e );

            if ( !Page.IsPostBack )
            {
                BindGrid();
            }
        }

        protected void Block_BlockUpdated( object sender, EventArgs e )
        {
            BindGrid();
        }

        protected void gPeople_Add( object sender, EventArgs e )
        {
            Response.Redirect( "~/NewFamily/" );

            // prevents .NET from quietly throwing ThreadAbortException
            Context.ApplicationInstance.CompleteRequest();
            return;
        }

        protected void gPeople_RowSelected( object sender, RowEventArgs e )
        {
            NavigateToLinkedPage( "RelatedPage", "PersonId", (int)e.RowKeyValues["Id"] );
        }

        protected void BindGrid()
        {
            var genderValue = GetAttributeValue( "GenderFilter" );

            var query = new PersonService( new RockContext() ).Queryable();

            if ( !string.IsNullOrEmpty( genderValue ) )
            {
                Gender gender = genderValue.ConvertToEnum<Gender>();
                query = query.Where( p => p.Gender == gender );
            }

            gPeople.DataSource = query.ToList();
            gPeople.DataBind();
        }
    }
}
Appendix - New Developer Environment Setup
If you're a relatively new .Net web developer we can walk you through a few things to help get you started on the right foot.
If you're not a .Net developer already, we probably can't make you one by reading this chapter. In that case you would be
best served by going through
some .Net introductions
or tutorials.
Installing Your Microsoft SQL Server (Database) Environment
We like to setup the database first. If you're licensed to use one of the paid versions of SQL Server go ahead and
download that now. Otherwise you can download
and use the free SQL Server Express version.
Going through the installer can be an interesting experience. For the most part we've found you can typically
use the default settings -- except for a few places. In those spots you really need to be careful and set things
just right:
-
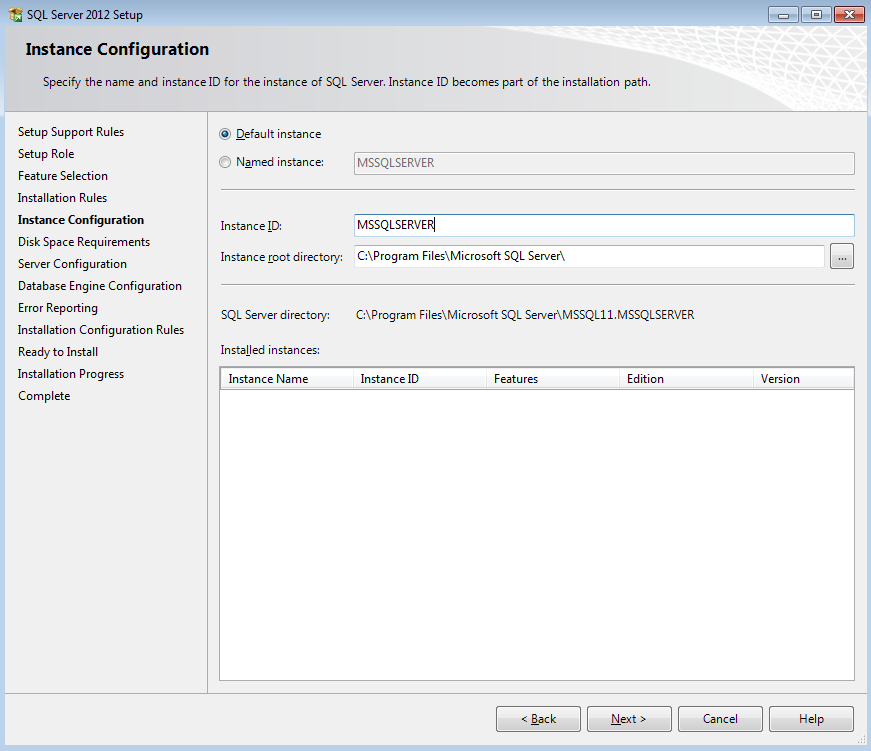
Instance Configuration - On the Instance Configuration page, choose Default Instance with Instance ID: MSSQLSERVER
(you can create a named instance if you want, but you might have to figure out your connection strings on your own).
Instance Configuration
-
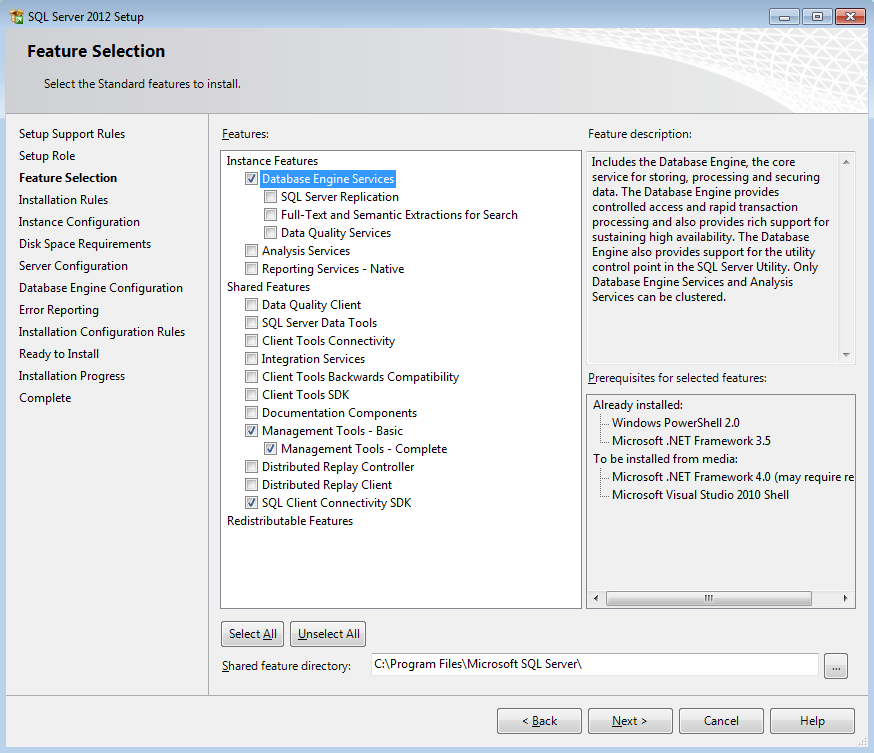
Feature Selection - On the Feature Selection page, you'll need at a minimum: Database Engine Services,
Management Tools, and SQL Client Connectivity SDK.
Feature Selection
-
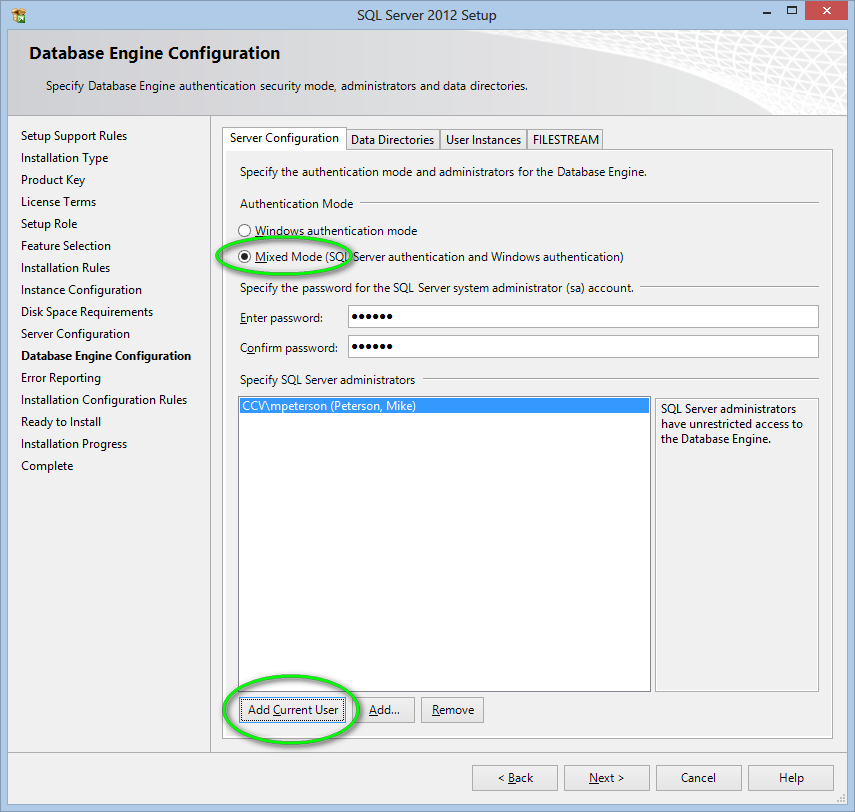
Database Engine Configuration - On the Database Engine Configuration page, make sure to choose Mixed Mode.
This is important! If you get weird errors later when trying build the Rock Database for the first time, an incorrect
setting here might be the problem. Also, enter some password for the SA account. Then, click Add Current User, and make
sure it adds your account. By the way, you probably won't ever really need to login as SA if you do the Add Current User.
Then press Next, and click thru the rest of the OK and Next buttons until the install is complete.
Database Engine Configuration
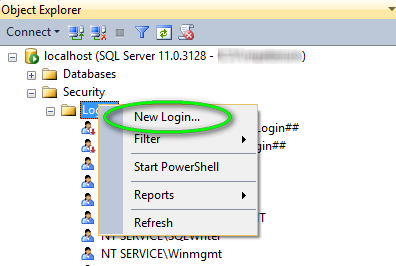
You will need to create a SQL Server Login called "RockUser". (You can actually use any name you wish but we recommend RockUser
to keep things simple for now.) You will need to use SQL Server Management Studio do to this
(which would have been installed when you did the Install SQL Server step, or if you add the Management Tools feature to
an existing SQL Server install.
-
After logging in, in the Object Explorer window, navigate to localhost | Security | Logins.
Next, right-click on Logins and click "New Login...".
New Login
-
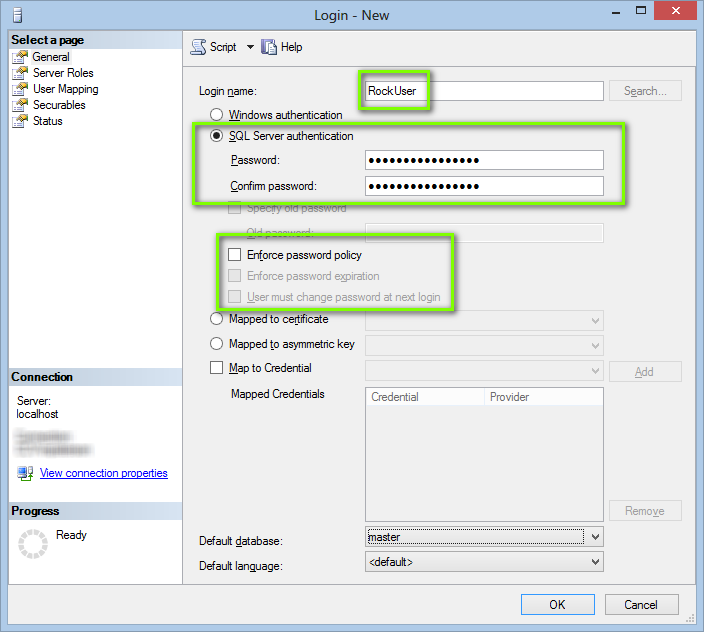
On the Login - New page, put RockUser as the Login name and choose SQL Server authentication. For the password
you'll probably want to uncheck the "Enforce password" and "User must change password" checkboxes.
NOTE: You'll also need to copy this password to your web.ConnectionStrings.config as described in the next chapter.
Don't press OK yet, do the next step (Server Roles) first!
Login Properties, General
-
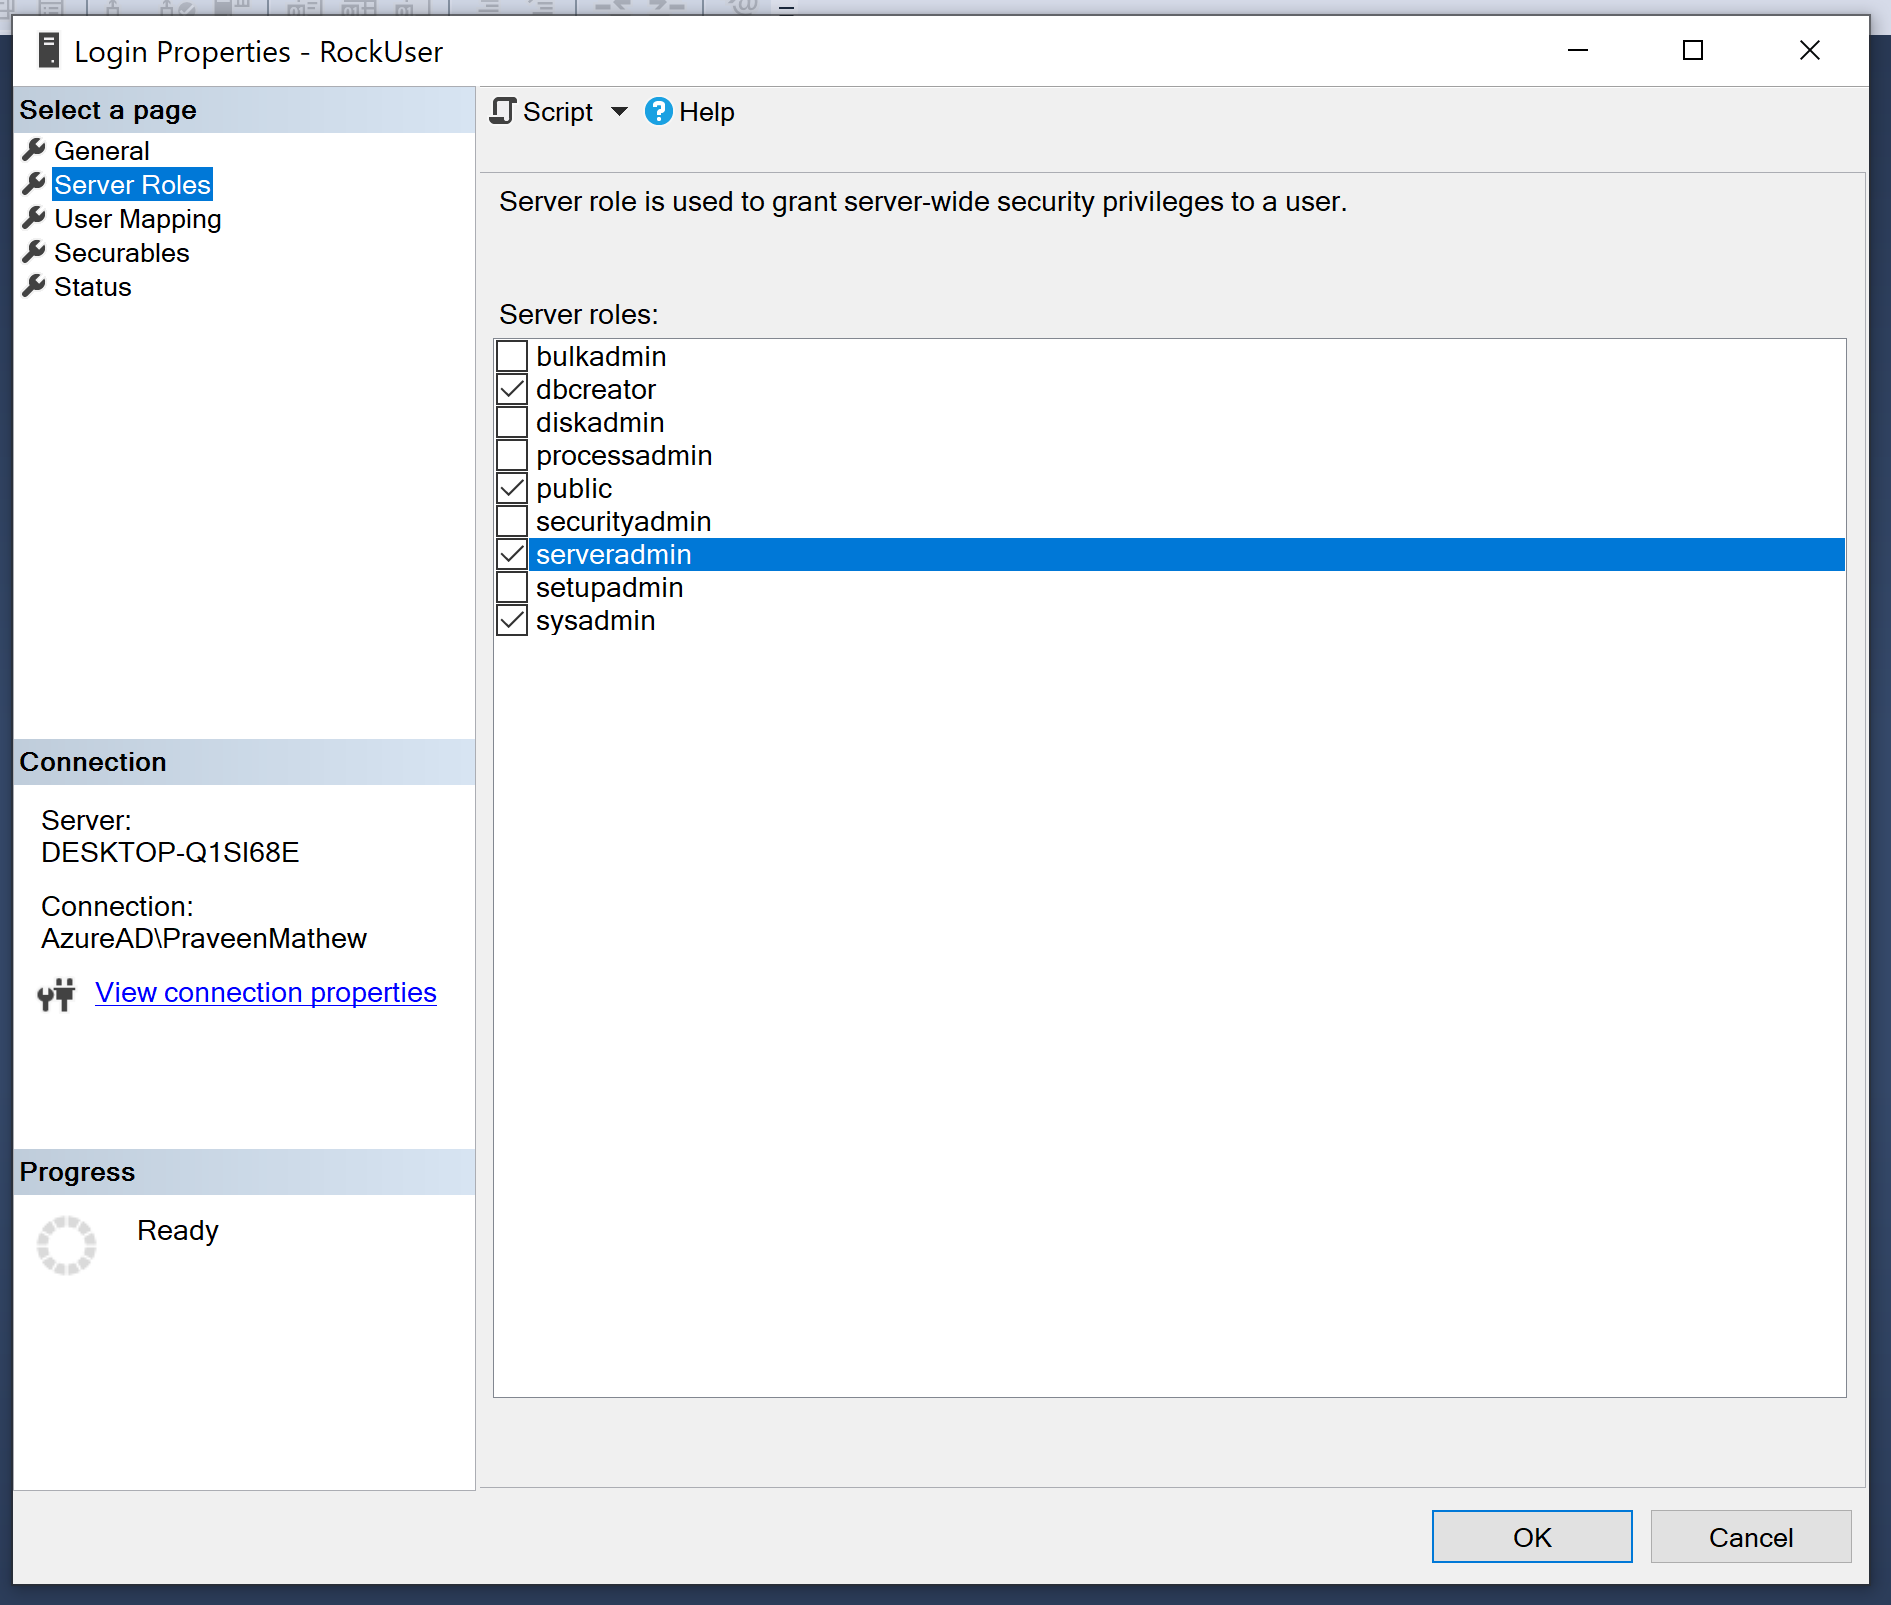
While still on the Login - New page, select "Server Roles" then check "dbcreator" and "public".
Now you can press OK, and your SQL Server RockUser login is created.
Login Properties, Server Roles
Installing Visual Studio
If you're licensed to use one of the paid versions of Visual Studio go ahead and
download it now. Otherwise you can download the free
"Visual Studio Community" version. If you run into any trouble Microsoft even has a
Live Chat support to assist you.
Visual Studio Workloads
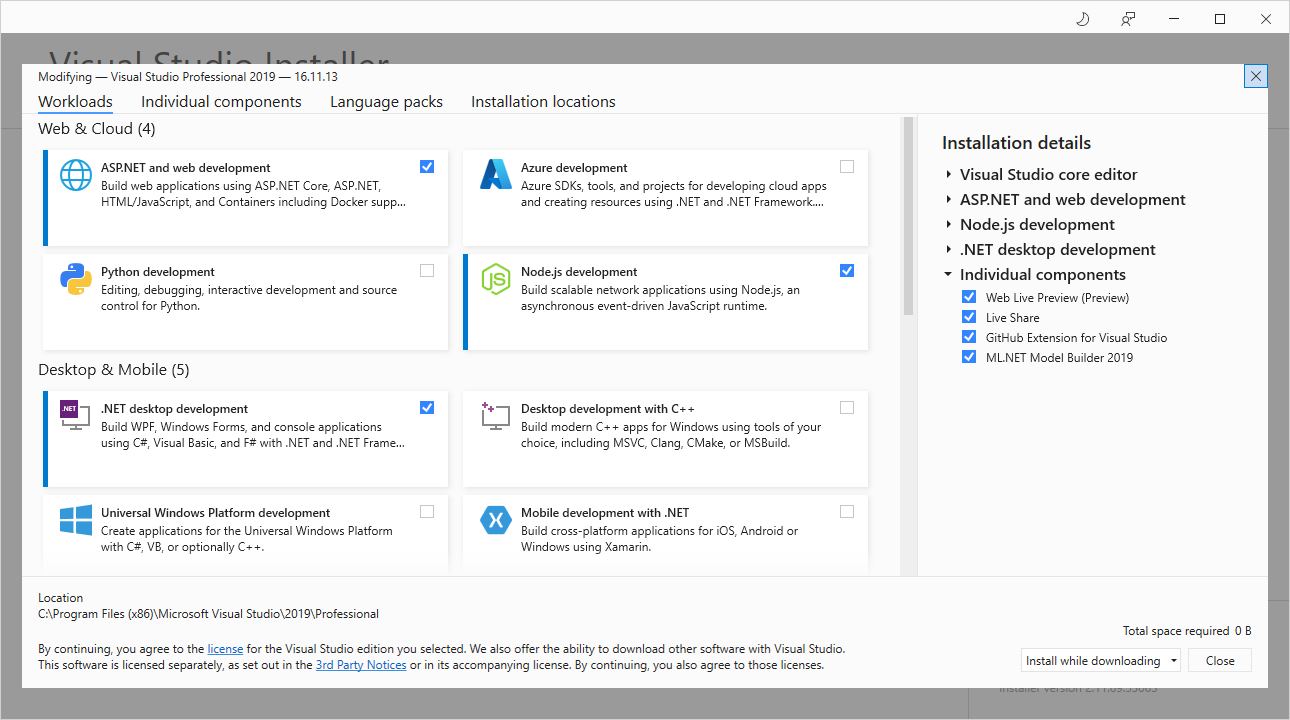
Run the Visual Studio Installer and select "Modify" on your installation. Then install these workloads:
- "ASP.NET and web development"
- "Node.js development"
- (optional) ".NET desktop development"
Visual Studio Workloads
Troubleshooting
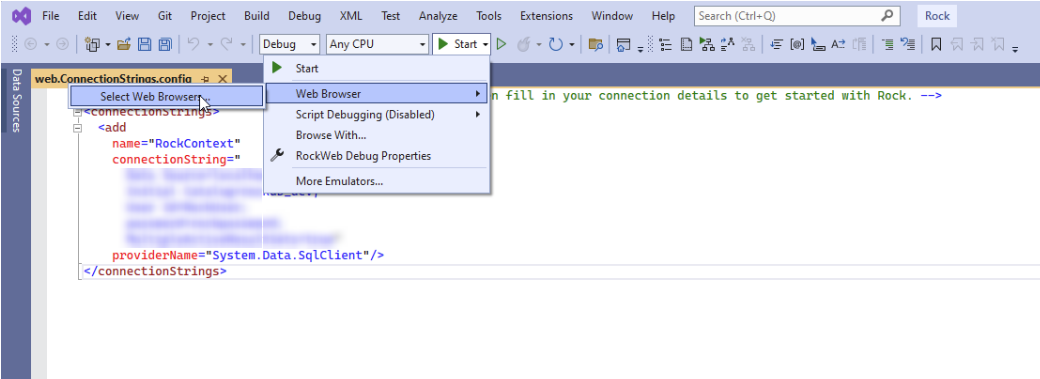
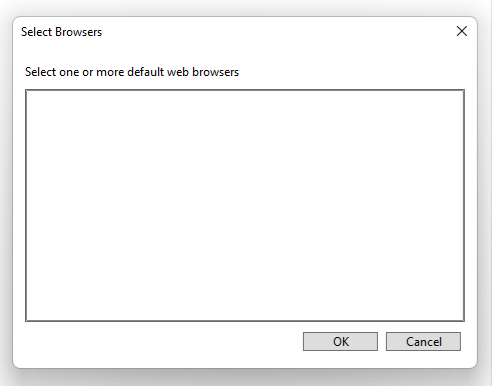
If Visual Studio crashes upon running, make sure the Visual Studio "Start" > "Web Browser" has a browser selected.
Visual Studio Debug Web Browser Setting
 Visual Studio Debug with missing Web Browser
Running
Once you have Visual Studio up and running, you're all set to open up the Rock solution file. Once you
open that you'll want to adjust your web.ConnectionStrings.config file as described in the Setup Appendix.
Appendix - Setup
Opening your Solution
These are the steps you'll follow the first time you
use the Rock solution.
- Open the Rock.sln file. This should launch Visual Studio 2022.
-
Edit the web.ConnectionStrings.config.sample
and replace the
[server_name], [database_name],
[user_name], and [password] with the
values for your system. When you're done it might look something like this:
<add name="RockContext"
    connectionString="Data Source=localhost;Initial Catalog=RockTestDB;
    User Id=MyRockUser; password=yOursShouldBeBetter;MultipleActiveResultSets=true"
    providerName="System.Data.SqlClient"/>
Important!
Make sure the SQL User Id you use has the dbcreator role.
The first time Rock runs it will see that the database does not
exist and will need to create it for you.
Note: If using SQL Express / LocalDB Edition, your connection string will look a bit different
and also needs to include some other parameters as seen here:
<add name="RockContext"
    connectionString="Server=(localdb)\v11.0; Initial Catalog=RockTestDB;
    Integrated Security=true;MultipleActiveResultSets=true; Persist Security Info=true;"
    providerName="System.Data.SqlClient"/>
-
Then rename the file to web.ConnectionStrings.config
-
Go to Tools > NuGet Package Manager > Manage NuGet Packages for Solution...
-
If you see a
Restore
button you'll need to click it in order to fetch the required open-source
libraries Rock needs to compile. We don't ship them in the SDK in order to
keep the file size small. After clicking "Restore" you can close the window.
Manage NuGet Packages for Solution

Press F5 to build and run (debug) Rock. After completing the compile/build process, it will start your web-browser (on something like http://localhost:57566/) and you'll see a white screen for several minutes while it creates the database.
When finished, you will see a Login screen:
Login
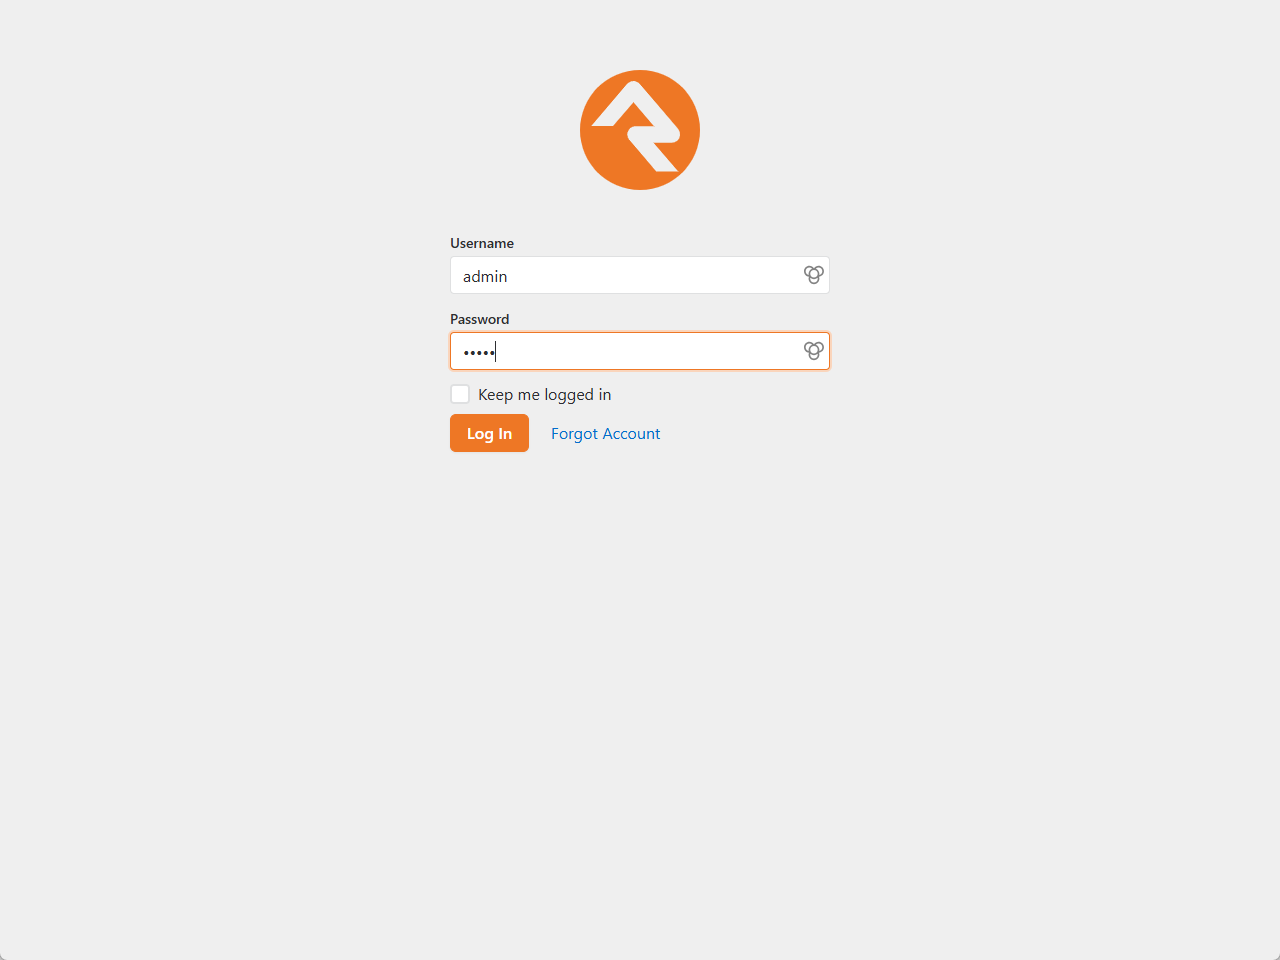
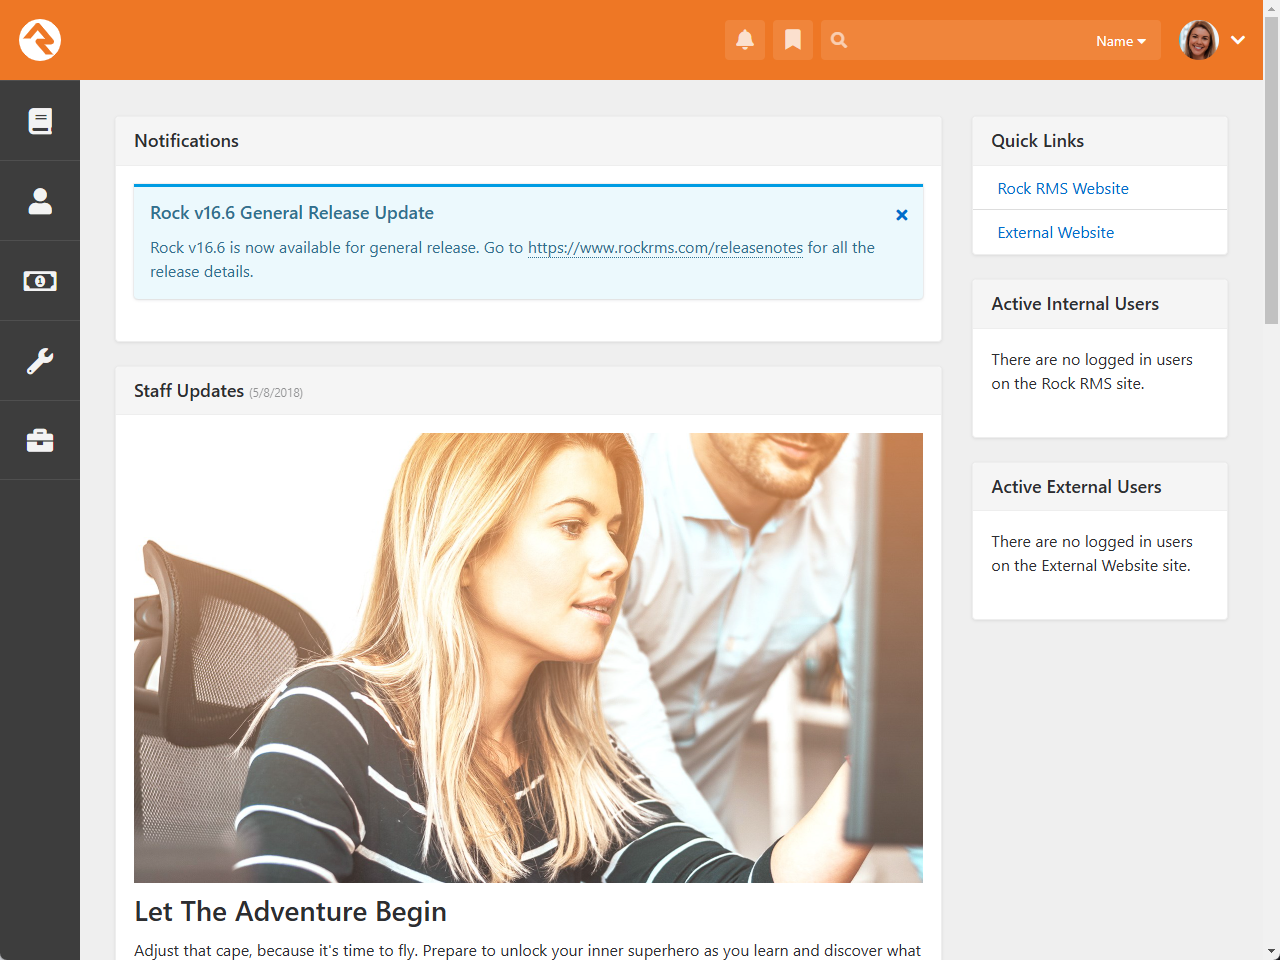
...and after logging in with 'admin' you should see this:
Home
That's it. Happy coding!
Updating your Environment
Steps to keep your environment up-to-date with upcoming Rock releases:
-
Subscribe to our developer group (in the Community Developer Subscribe sidebar) to get notified when a release goes alpha.
-
Join the #develop channel on our community.rockrms.com/chat. Let us know you're new and a
friendly developer in the community should greet you there.
-
Pull the latest from the Rock repo as needed. We use a Gitflow Branching Strategy
so if you wanted to only work from a particular release, you can pull that particular
release-x.y.z branch. Hotfix branches are
hotfix-x.y.z.